Getting a new diagnosis is a big milestone, and there are a few different ways to record it in Bearable depending on what you’d like to do with that information afterwards. Here’s a quick rundown of your options.
Option 1: Create a new Symptom Group (best for ongoing tracking)
If you’d like to actively track symptoms related to your new diagnosis going forward, creating a dedicated Symptom Group is the best option.
How to set it up:
Tap the … icon on the Symptoms section.
Tap Add/edit.
Tap Add Symptom Group.
Name it after your diagnosis, e.g. “POTS.”
Choose an icon and save.
Tap into the group and use the search bar to add the specific symptoms you’d like to track.
This is the right choice if your goal is to monitor how the condition affects you over time.
Option 2: Log it as a Significant Event (best for marking the date)
If you mainly want a record of when you were diagnosed — so you can look back and compare your data before and after — logging it as a Significant Event is a simple way to do this.
How to set it up:
Go to Settings.
Find and tap Significant Events.
Add your diagnosis as an event with the relevant date.
This marker will then appear when you view your Trends reports, making it easy to spot before-and-after changes in your Mood, Symptoms, Energy, and more.
Option 3: Add it as an Extra Note (best for context and details)
If you’d like to record more detail — like what the doctor said, next steps, or how you felt about the diagnosis — an Extra Note is a good option.
How to set it up:
Tap customise homepage at the bottom of your home screen.
Toggle the Extra Notes section on (if it isn’t already).
Add your note from the home screen.
You can review these later via the timeline, which you can filter to show just your Extra Notes.
Option 4: Log it as a Status (best for marking how a period felt)
Bearable also has a Statuses feature, which some people use to mark particular periods of time — for example, days affected by a new diagnosis or adjustment period.
How to turn it on:
Tap customise homepage at the bottom of your home screen.
Toggle the Statuses section on.
Tap the + icon
Add a new status for your diagnosis e.g. POTS
Save this new status and then toggle it on
Which should you use?
Want to actively track symptoms of the new condition? → Symptom Group
Want a simple marker of the date, mainly to compare before/after in your Trends? → Significant Event
Want to capture extra context or details? → Extra Note
Want to mark how a period of time felt overall? → Status
You don’t have to pick just one — many people use a combination, such as a Significant Event to mark the date, plus a new Symptom Group to track things going forward.
The default Symptoms section in Bearable uses a simple 0–4 severity scale (None, Mild, Moderate, Severe, Unbearable). But if you want more detail — like a 0–10 pain scale, how many times a symptom occurs, or how long it lasts — custom Health Measurements let you track all three. Here’s how.
Getting started
Before creating any custom Health Measurement, make sure the section is enabled:
Tap customise homepage at the bottom of your home screen.
Toggle Health Measurements on.
From there, the steps below all start the same way:
Tap the … icon on the Health Measurements section.
Tap Add/edit.
Tap Create custom measurement.
Then follow the specific steps below depending on what you want to track.
Tracking Severity (e.g. a 0–10 pain scale)
If you’d like a more granular scale than Bearable’s default 0–4 Symptom severity, this is the option for you.
Name your measurement, e.g. “Back Pain.”
Select your scale, e.g. 0–10.
Choose whether you want to see the Average, Total, or Latest score in your reports (you can change this anytime).
Select decimal places — 0 for round numbers, or 2 for more precision.
Choose an icon and save.
Tracking Frequency (how many times something happens)
This is ideal for symptoms that occur multiple times a day, like waking up, panic attacks, or migraines.
Name your measurement, e.g. “Migraine episodes.”
Select Count as the measurement type.
Choose an icon and save.
You can then log an entry of 1 each time the symptom occurs and view your daily totals or averages in the Trends tab.
Tracking Duration (how long a symptom lasts)
If you want to know how long each episode of a symptom lasts, you can set up a Duration measurement.
Name your measurement, e.g. “Migraine duration.”
Select Duration as the measurement type.
Choose an icon and save.
You’ll then be able to log the hours and minutes each time the symptom occurs.
Viewing your reports
For any custom Health Measurement:
Trends: Tap the … icon on the Health Measurements section, select graphs, then choose your metric.
Impacts: Tap the Impacts tab, tap Mood, then select your custom measurement to view correlations with your Factors.
A few tips
You can create separate measurements for Severity, Frequency, and Duration of the same symptom if you want the full picture — for example, “Migraine Severity,” “Migraine Count,” and “Migraine Duration.”
Custom Health Measurements are a premium feature, so you’ll need a Bearable Pro subscription to set these up.
Start with just one or two measurements for your top priority symptom rather than setting up everything at once — you can always add more later.
Hydration can affect everything from energy to headaches to sleep, so it’s a common thing people want to track in Bearable. There are actually three different ways to do this, depending on how much detail you want. Here’s a quick rundown.
Option 1: The built-in Hydration tracker (simplest)
Bearable has a built-in hydration tracker in the Nutrition section, which lets you log your intake by number of cups.
How to use it:
Open the Nutrition section on your home screen and log your cups of water as you go.
To change the unit of measurement (e.g. from fluid ounces to litres):
Open Settings.
Scroll down to the Customise section.
Tap Units.
In the Water section, select your preferred unit.
This option is great if you just want a simple daily total with minimal setup.
Option 2: Variable Factors (for tracking types or amounts)
If you want more nuance than “cups of water” — like tracking specific drink types or how much you’re having of each — you can create custom variable Factors in the Nutrition section. Variable Factors let you log an amount (none, little, some, lots) rather than just yes/no.
This is useful for things like:
Specific types of hydration, e.g. Water, Tea, Coffee, Juice, Protein shake
Methods of hydration, e.g. “water before midday,” “water before bed”
How to set these up:
Tap the … icon on the Nutrition section.
Tap add/edit.
Type the name of your custom Factor.
Select Variable (none, little, some, lots).
Tap the checkmark to save.
💡 Tip: If you turn on Time Periods for the Symptoms and Other Factors sections, you can also log Nutrition Factors against a specific time period (AM, MID, PM) by tapping the time period at the top of the Nutrition section, then Factors, then selecting your Factor.
Option 3: Factor Ranges (for tracking specific quantities)
If you’d rather track hydration in terms of clear quantity thresholds — for example, to see whether drinking over a certain amount correlates with better or worse symptoms — you can set up a series of binary Factors representing different quantity ranges, such as:
0 – 5 cups
5 – 10 cups
10 – 15 cups
How to set these up:
Tap the … icon on the Nutrition section.
Tap add/edit.
Add each quantity range as its own binary Factor (happened vs. didn’t happen).
Tap the checkmark to save each one.
This approach makes it easy to spot correlations in the Impacts tab between hitting a certain hydration threshold and changes in your symptoms, mood, energy, or other health outcomes.
Which should you use?
Want the simplest option with minimal setup? → Built-in Hydration tracker
Want to track specific drink types or general amounts? → Variable Factors
Want to test whether hitting a specific quantity threshold makes a difference? → Factor Ranges
As always, we’d recommend starting with just one approach that matches your main goal, rather than setting up all three at once. You can always add more later if you find you need it.
Sometimes it’s not just about tracking whether something happened — the timing matters too. If you want to capture more detail about when a Factor took place during your day, Bearable gives you two options: Time Periods and Factor Ranges. Here’s how each one works.
Option 1: Time Periods (great for correlations)
Time Periods split your day into four chunks
PRE (midnight–6am)
AM (6am–midday)
MID (midday–6pm)
PM (6pm–midnight)
This is the best option if your main goal is to see same-day correlations in the Impacts tab — for example, whether something you do in the morning affects your symptoms later that afternoon.
How to turn it on:
On your home screen, tap the … icon on the Other Factors section (you can also do this for Symptoms).
Tap Time Periods to toggle it on.
You’ll now be able to log Factors against PRE, AM, MID, or PM from the home screen or your daily check-in.
📝 Note: Time Periods are only available in the Symptoms and Other Factors sections.
Option 2: Factor Ranges (great for more specific timing)
If PRE/AM/MID/PM isn’t precise enough, say you want to know whether taking your meds at 7am vs. 10am makes a difference, you can create a set of separate binary Factors to represent specific times or ranges. Each one is logged as either “happened” or “didn’t happen.”
For example, if you’re testing medication timing, you could create:
Took meds at 7am
Took meds at 8am
Took meds at 9am
Took meds at 10am
How to set these up:
Tap the … icon on the Other Factors section.
Tap add/edit.
Create a new group to keep things tidy (e.g. “Meds Timing”).
Use the search bar at the top to add each time-based Factor as a binary option.
This way, you’ll be able to see in the Impacts tab exactly how the timing of something correlates with changes in your symptoms, mood, energy, or other health outcomes — something Time Periods alone can’t always capture if the differences fall within the same time period.
Which should you use?
Want a simple way to log Factors by general part of the day and see same-day correlations? → Time Periods
Want to zoom in on a specific time (like comparing 7am vs. 10am) or a distinguishing factor Time Periods can’t capture? → Factor Ranges
Not sure which fits your situation? You’re welcome to use both — Time Periods for the everyday stuff, and Factor Ranges when you need to test something more specific.
As always, we’d recommend keeping things simple to start — only set up as many Factors as you need to answer the question you care about most. You can always add more later.
If you’re trying to get a clearer picture of when your symptoms happen during the day, Bearable gives you two different tools to help: Time Periods and Custom Health Measurements. They work a little differently, so here’s a quick guide to help you pick the right one (or use both!).
Option 1: Time Periods (great for correlations)
Instead of just giving you one entry for the whole day, time Periods split your day into four chunks:
– PRE (midnight–6am) – AM (6am–midday) – MID (midday–6pm) – PM (6pm–midnight)
This is the best option if your main goal is to see same-day correlations between your symptoms and factors (like food, activities, or meds) in the Impacts tab.
How to turn it on:
On your home screen, tap the … icon on the Symptoms section (you can also do this for Other Factors).
Tap Time Periods to toggle it on.
You’ll now be able to log a separate symptom entry for each time period, either from the home screen or your daily check-in.
📝 Note: Time Periods are only available in the Symptoms and Other Factors sections. Other sections either already use timestamps (like Health Measurements) or don’t need time-based tracking (like Sleep or Gratitude).
Option 2: Custom Health Measurements (great for exact timing)
If you want something more precise than “morning” or “evening” – like the exact time a symptom occurred – a custom Health Measurement is the way to go. This lets you log entries with a real timestamp, so you can track things like frequency or patterns down to the minute.
How to set one up:
Tap customise homepage at the bottom of your home screen and make sure Health Measurements is toggled on.
Tap into the Health Measurements section on your home screen.
Tap Add Other, then Create custom measurement.
Give it a name (e.g. “Migraine episodes”), choose a measurement type (like Count, or a 0–10 scale), pick an icon, and save.
From then on, you can log an entry with a timestamp each time the symptom happens.
💡 Custom Health Measurements are a premium feature, so you’ll need a Bearable Pro subscription to set these up.
Which should you use?
Want to spot patterns and correlations across your whole day? → Time Periods
Want to know the exact time something happened, or track frequency in detail? → Custom Health Measurements
Want the best of both → Custom Health Measurements
As always, we’d recommend starting small, pick one or two symptoms that matter most to you right now, rather than trying to track everything at once. You can always add more later.
If you track your health with a Fitbit, you may have noticed your app looks different lately. Google has renamed and redesigned the Fitbit app, and there’s one step some users still need to take to keep everything working.
We know that admin like this is the last thing you want to deal with when you’re already managing your health day to day. So we’ve kept this short. Here’s exactly what’s changed, why, and what (if anything) you need to do.
The short version
There are really two separate things happening here, and it’s easy to mix them up:
The app changed automatically. The Fitbit app is now the Google Health app. It updated itself — you didn’t need to download anything, and your data came across on its own.
Your account may still need to move. This is the part that needs you. If you sign in with an old Fitbit account, you’ll need to move it to a Google Account to keep using the app.
If you only remember one thing: the app updating itself does not mean your account has moved. Those are different steps.
What’s actually changed
The Fitbit app became the Google Health app on May 19, 2026, with a new name, icon, and layout. Your favorite features are still there, with a few upgrades:
A simpler layout with four tabs: Today, Fitness, Sleep, and Health
Dashboards you can customize so your most important numbers are front and center
More data in one place — activity, sleep, vitals, and (in the US) your medical records like lab results and medications
The ability to connect other apps and devices you already use
A new AI-powered Google Health Coach for personalized insights (this is part of a paid Google Health Premium subscription)
You don’t have to use the new features if you don’t want to. The core tracking you rely on works the same way.
Why Google made this change
According to Google, moving to a Google Account gives you one login across your connected apps and devices, along with Google’s privacy and security controls in a single place. Google has also stated that your Fitbit health and wellness data stays separate from Google Ads and won’t be used for advertising.
A Google Account is now also required to set up a new Fitbit or activate a newly released device.
What this means for your Bearable data
This is a change on Google’s side, not ours. Your Bearable account, your logs, and your history are not affected. You don’t need to do anything inside Bearable.
If you sync health data from your Fitbit into Bearable, completing the account move below is the best way to keep that connection running smoothly. If you ever notice your data isn’t flowing through after migrating, our support team is happy to help you reconnect.
The dates that matter
July 15, 2026 — This is the one to circle. After this date, Google begins deleting Fitbit accounts that haven’t been moved to a Google Account. If your account isn’t migrated by then, you risk losing access to it and your history.
You can download or delete your own data at any time before that date if you’d like a personal copy.
If you’re still using an old Fitbit account, it’s worth taking a few minutes to move it sooner rather than later, so it’s one less thing on your plate.
How to move your account
The steps are the same on iPhone and Android. The whole thing takes just a few minutes.
Before you start, you’ll need a personal Google Account. (A work or school Google Workspace account won’t work for this — if that’s all you have, you can create a free personal one.)
Open the Google Health app (the app that used to be Fitbit)
Sign in with your Fitbit account
Tap Settings → Move account
Follow the on-screen instructions
A few helpful things to know:
You can cancel any time up until the final step, so it’s safe to start and stop if you need a break.
Once it’s finished, the move can’t be undone, so it’s worth doing when you have a quiet few minutes.
Created your Fitbit account with a Gmail address? You still need to do this — having a Gmail address on its own doesn’t count as having moved.
Make sure your phone is ready
The only real difference between iPhone and Android is the software version you need and where you get app updates:
iPhone
Android
Software needed
iOS 16.4 or newer
Android 11 or newer
App updates come from
the App Store
the Google Play Store
A small number of older phones may have trouble even when they meet these requirements, including the Huawei P8 Lite, P9 Lite, and P20 Lite, and the Xiaomi Mi 6.
Keeping your Fitbit data flowing into Bearable
If you use Bearable to bring in data from your Fitbit, that link runs through a “hub” app — Health Connect on Android, or Apple Health on iPhone. After moving your account, it’s worth a quick check that Bearable still has permission to read your data.
On Android (through Health Connect)
Your Fitbit data flows into Health Connect via the Google Health app, and Bearable reads it from there.
To check or grant Bearable’s permissions:
Open Health Connect on your phone. (On newer Android phones it lives inside your Settings; on others it’s a separate app you open directly.)
Tap App permissions.
Select Bearable from the list.
Turn on Allow all, or switch on just the data types you’d like Bearable to read — for example steps, sleep, or heart rate
Once you have added permissions via Health Connect, Bearable should be added to the list of partner apps in the Google Health app [more info here]
Open the Google Health app.
At the top left, tap Connections.
Tap Partner apps or Apps and services.
Tap the third-party app or device you want to add and follow the instructions.
If Bearable isn’t in the list yet, open Bearable first and start the Health Connect connection from your Bearable sync settings. It will then appear in Health Connect for you to approve.
On iPhone (through Apple Health)
On iPhone, Bearable reads your data from Apple Health.
To check or grant Bearable’s permissions:
Open the Apple Health app.
Tap the Sharing tab, then Apps.
Tap Bearable.
Review the list and turn on the data types you’d like to share.
One thing to know on iPhone: right now, the Google Health app only reads data from Apple Health — it doesn’t yet write your Fitbit data back into Apple Health. That means data recorded by your Fitbit may not show up in Apple Health (and so won’t reach Bearable through this route) for the time being. Google has said two-way syncing is coming later in 2026. In the meantime, anything you log directly in Apple Health, or that comes from your other connected apps and devices, will still sync to Bearable as usual.
In Bearable your data is split between various sections where you can track different aspects of your health
You can turn on/off sections to customise the things you would like to track. to do so, scroll to the bottom of the homepage and press “Customise Homepage”.
The toggles on the left let you turn on or off sections. Use the handles on the right to drag the sections and change their order.
😑 Mood
💡 For tracking your mood and emotional state throughout the day.
Track your Mood if you want to understand:
What might impact your Mood
Whether your Mood and Feelings are changing over time
To help you reflect and learn more about yourself and your emotions
How your Mood may impact your other health outcomes
The Mood scale
Bearable uses a 1-10 scale, with lower numbers representing worse moods and higher numbers representing better moods.
Each person is different and will have their own meanings but typically this will be:
1-3 (Low): Very poor mood, feeling significantly down, anxious, or distressed
4-6 (Moderate): Neutral to mildly positive or negative moods
7-10 (High): Good to excellent mood, feeling positive, content, or happy
Adding Feelings
After pressing your mood you will see a place to add Feelings and any Notes relating to this entry.
You can add as many feelings as you want
Customising the list of feelings
Press the ‘+’ button to go to the Edit page
Add a new feeling by typing at the top and pressing Confirm
Turn feelings on/off: Use the toggles on the left. Feelings that are turned off will no longer appear in the list but any entries you made of that feeling will still be shown
Edit a feeling name: Press on a feeling, then press the feeling name box. Press the tick in the top right when you’re done
Reorder feelings by pressing the edit button at the top right and dragging the handles on the right. You can also sort the feelings alphabetically by pressing the ellipsis (…) on the Mood section and toggling “Sorting” from Custom to A-Z
Delete feelings by tapping the feeling name and pressing Delete Feeling. Deleting a feeling also deletes entries of that feeling
Removing an entry
Tap the Mood entry you want to delete, then tap the trash can icon at the top left of the modal.
Mood insights
The score on the section represents your Average Mood.
Press the ellipsis (…) on the Mood section and tap Graph + Insights
You can also see Mood insights on the Impacts tab and Trends tab
🤕Symptoms
💡For tracking the presence and severity and physical or emotional symptoms
Track symptoms to understand:
Your daily symptom score
Possible symptom triggers
Whether symptoms are changing over time
How often symptoms occur
How to record symptoms
The section shows a list of symptoms you have active, sorted by Group. Press a rating to record a symptom entry
Each person’s ratings will depend on their personal experience. You can log a symptom you don’t have active. Press the ‘Log other’ button at the bottom of any group
Adding a Symptom note
After making a rating press the page with a plus button to make a symptom note.
Changing or removing an entry
Press the entry again to choose a new rating
Press the ‘-’ sign on the left to remove an entry
Mark Remaining as None
This button is a shortcut: any symptoms without an entry will be marked as 0. This can improve insights as it helps to distinguish days when symptoms were not present and days when no data was entered.
Adding a symptom
Press the Add/Edit button at the top of the section. Then press the Group you want to add the Symptom to.
Use the toggles on the left to turn on/off symptoms.
Add any custom symptom by typing at the top and pressing Confirm
Customising symptoms (from the Edit menu)
Press the Add/Edit button at the top of the section.
Add a new group by pressing “Add symptom group”
Edit a group by pressing the Group and tapping “Group settings” at the bottom
Reorder groups by pressing Edit at the top right and dragging the Groups using the handles
Reorder symptoms within a group by pressing on the group and pressing Edit, then use the handles to drag the symptoms to the order you like
Sort symptoms alphabetically by going to the ellipsis (…) at the top right of the section and toggling between Sorting: Custom and Sorting: A-Z
Move symptoms between groups by pressing on a symptom name and then picking a group from the selection
Edit a symptom name by pressing on a symptom, pressing on the Description and confirming using the tick at the top right. Note, you cannot edit default symptoms but you can hide them.
Delete a symptom by pressing on the symptom name and pressing Delete Symptom. You cannot delete the default symptoms
Entering symptoms through the day
You can track how your symptoms change over the day. Press the ellipsis (…) at the top right of the Symptoms section and toggle between Time Periods ON and Time Periods OFF.
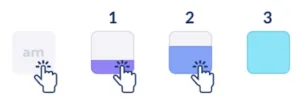
When time periods are on you will see four boxes. Tap a box multiple times to change the severity. The four boxes relate to different parts of the day
Pre: Midnight – 6am
Am: 6am – Midday
Mid: Midday – 6pm
Pm: 6pm – Midnight
💡 Tracking throughout the day requires more effort and we suggest you only do this if it’s necessary for your symptoms
Symptom insights
Press the ellipsis (…) at the top right of the symptoms section and choose Graph + Insights
You can view correlations between symptoms and other health factors in the Impacts tab
You can see how your Symptoms have been changing in the Trends tab
⚡ Energy
💡 For tracking Energy Levels through the day
How to record energy levels
Simply tap a rating from 1-5
1️⃣ Very low
2️⃣ Low
3️⃣ OK
4️⃣ High
5️⃣ Very high
The scale should be used according to your own baseline. Even if you never have what others might describe as “very high” energy levels, it can still be very high for yourself.
To add another entry tap the ‘+’ button
If you add multiple entries, the energy score shown on the closed section represents your average energy level
Changing the entry time
Tap the underlined time to bring up the clock picker.
Adding a note
You can add a written note for each entry by pressing on the button with a page and plus symbol. This button appears after you make a 1-5 rating.
Removing an entry
Press the ‘-’ symbol to the left of the rating
🔥 Other Factors
💡 For recording anything you do that could impact your health, such as activity level, stress, work, social life and personal care. This can include triggers and treatments for your different symptoms and conditions.
How to record factors
Factors can be entered in two ways
a binary scale,
variable scale, such as high/medium/low
For binary factors, just tap them and they’ll switch from off to on
For variable factors, tap the relevant rating
💡Copying last entries
If you do many of the same things each day you can copy your last entries. To do this press the ellipsis (…) at the top right of the Other Factors section and press “Copy Last Entry” at the bottom of this menu
The numbers in the Other Factors section
Shows the total number of factors with entries
Remove a factor entry
For binary factors just toggle them off again
For variable factors, press the ‘-’ symbol just underneath the name
Entering factors more than once a day
💡 Tracking throughout the day requires more effort and we suggest you only do this if it’s necessary for your symptoms
You can enter factors up to four times per day, using four time blocks
Pre: Midnight – 6am
Am: 6am – Midday
Mid: Midday – 6pm
Pm: 6pm – Midnight
To switch on the time blocks press the ellipsis (…) at the top right of the Other Factors section and toggle between Time periods: ON and Time periods: OFF
To enter into time blocks tap each box multiple times to set the rating.
If the factor didn’t happen in any time block, tap “No”
💡You can also tap the “Overall” box on the left to set all time periods together
Factor categories
Factors will be contained within different categories like Work and Lifestyle.
To add a new category, tap Add/Edit at the bottom of the section then tap “Add Category” at the bottom. Choose a name and symbol for the category, then press the tick at the top right corner
To move a factor into a category, tap Add/Edit at the bottom of the section, tap the category the factor is currently in, tap on the factor and then press the dropdown “Choose a factor category for this factor”
To edit a category, tap Add/Edit at the bottom of the section, tap on the Category and press Category Settings at the bottom of the screen. You can rename and change the symbols.
To delete a category, tap Add/Edit at the bottom of the section, tap on the Category, press Category Settings at the bottom of the screen, then press Delete Category.
⚠️ This will also delete factors within that category. You may prefer to hide it, or make sure you move the factors to other categories first
To show or hide a category, tap Add/Edit at the bottom of the section, then use the toggle on the left of the category name
To reorder categories, tap the Edit button at the top right, then use the handles to the right of each category to drag them into the order you want
Creating and editing factors
To add a new factor, tap the ‘+’ button at the bottom of the relevant category. At the top, enter the name of the new factor in the “Add Factor” box and tap “Confirm”. Press the tick at the top right to add the new factor.
To edit a factor name, tap the ‘+’ button at the bottom of the relevant category and then press the factor. Press the name to edit it
To change a factor scale, tap the ‘+’ button at the bottom of the relevant category and then press the factor. Choose the relevant scale, either binary or variable scale.
To hide a factor, tap the ‘+’ button at the bottom of the relevant category, then press the toggle to the left of the factor name
To delete a factor, tap the ‘+’ button at the bottom of the relevant category and then press the factor. Then press the “Delete factor” button at the bottom of this page. Deleting a factor will delete its data too. You may prefer to just hide the factor instead.
To change the order of factors:
If you want a custom order, tap the ‘+’ button at the bottom of the relevant category then press the Edit button at the top right of the screen. Use the handles to the right of each factor to drag them into the order you want and then press ‘Done’ at the top right.
If you want an A-Z order, press the ellipsis (…) at the top right of the Other Factors section and then toggle between “Sorting: Custom” and “Sorting: A-Z”
😴 Sleep
💡 For tracking the amount you sleep, your sleep quality and related factors such as reading before bed
Entering Time asleep
👉 Enter your Sleep for the previous night
Press the +/- buttons to quickly enter a sleep amount
If you want to enter the start and end times, press the middle button
To enter an exact amount press the middle button and then “tap here to enter manually”
To remove Time Asleep
Press the middle button and then press the trash can icon in the top right
Entering Sleep Quality
👉 Enter your Sleep Quality for the previous night
Press a rating from 1-5
1️⃣ Awful
2️⃣ Poor
3️⃣ OK
4️⃣ Good
5️⃣ Great
You can add a note by pressing the button with a page and + symbol. Some users record dreams, interruptions or things for their doctors.
Entering Sleep Factors
👉 Enter your Sleep Factors for the previous night
Sleep factors are things that might impact your health relating to your sleep, like an early bedtime, reading before bed or using a CPAP machine.
Toggle these factors on and off by pressing them.
Customising Sleep Factors
Show or hide sleep factors by pressing the ‘+’ button and then using the toggles to the left of the factor names
Add new Sleep factors by pressing the ‘+’ button and typing at the top.
Edit the order of Sleep factors by pressing the ‘+’ button, then pressing Edit, and using the handles to the right of the factors to drag them into a custom order
Sort them alphabetically by pressing the ellipsis (…) at the top right of the Sleep section and toggling between Sorting: Custom and Sorting: A-Z
Entering Naps
You can record naps in the Nap time factor. Turn this on by pressing the ‘+’ button at the bottom of the section and using the toggle next to “Nap Time”.
Use the +/- buttons to enter the total time you napped today
Entering Time in Bed
Sometimes you spend time in bed when awake. You can track this in the Time in Bed factor.
Turn this on by pressing the ‘+’ button at the bottom of the section and using the toggle next to “Time in Bed”.
Press the button to enter the time you got into bed and the time you got out of it. If you enter both the total time will be calculated
Syncing Sleep
You can also sync your Time Asleep and Time in Bed.
Press the “Sync sleep from your device” button at the top of the section.
Following the instructions on the syncing page to set this up.
👋 Still have questions?
Let us know by contacting support@bearable.app and a member of the Bearable team can help you with anything you need.
For the time being, our app is designed to work and sync seamlessly on one device. This is what most of our users require, but we totally understand that you and some others could really benefit from being able to sync Bearable on more devices.
We do indeed have plans for multi-device capabilities (i.e. instant updates across devices), but this is fairly complex to implement for a product at our stage, hence why you usually only see it done by bigger companies (e.g. Google Docs, popular chat apps).
In the meantime, to make sure you get the best experience possible, please use Bearable on one device. Using multiple devices simultaneously can lead to data conflict issues and thus result in data loss. We plan to make this much clearer to users in the very near future with a warning message when a new device is detected to make sure there is less uncertainty around the issue.
However, you can still move permanently to another device, simply by logging out of device A and staying logged in on device B, you just can’t be logged into both simultaneously.
👋 Still have questions?
Let us know by contacting support@bearable.app and a member of the Bearable team can help you with anything you need.
We frequently discount Bearable’s annual subscription price by up to 76%. If you’re not shown this within the app, please get in touch with us at support@bearable.app and we can advise you on how to access Bearable Premium at a discounted price.
👋 Still have questions?
Let us know by contacting support@bearable.app and a member of the Bearable team can help you with anything you need.
We have a sponsorship program called ‘Bearable Heroes’ that gifts between 50 and 200 monthly subscriptions every month.
Other than having a Bearable account that has been used recently, there are no requirements for applying for sponsorship, and you’re also welcome to apply every month.
Sponsored subscriptions are gifted between the 5th & 10th of each month. These are subscriptions paid for by members of the Bearable community and Bearable team.
To apply for a free sponsored subscription:
Open Bearable
Go to the settings screen using the cog icon in the top-left corner of the home screen
Scroll down to and then tap on ‘Become a Bearable Hero’
Scroll to the bottom of the ‘Become a Bearable Hero’ screen
Tap the ‘Enter the raffle’ button
This will take you to a short survey where you can apply for a sponsored subscription
We created this program so that anyone whose income is impacted by their health can still access Bearable Premium. However, we do also want to point out that most of Bearable’s features are free and we offer a number of workaround solutions for paid features in the free version of the app. If you’d like some help using the free version of Bearable, please get in touch with our team at support@bearable.app
👋 Still have questions?
Let us know by contacting support@bearable.app and a member of the Bearable team can help you with anything you need.