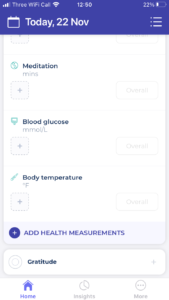
On the homepage, simply click on the “ADD HEALTH MEASUREMENTS” at the bottom of the Health Measurements section.
 .
. 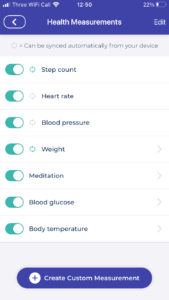
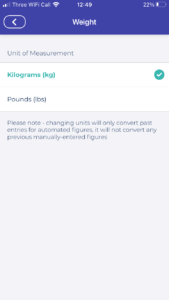
⚖️ Weight
Click on Weight, and you’ll see the option to change from kg (kilograms) to lbs (pounds). Note that this will not convert any previous manual entries you have made in kilos (and vice versa), it will only convert previous auto-synced entries.
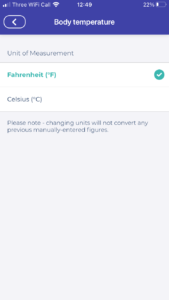
🌡️ Temperature
Click on Temperature and you’ll see the option to change from Farenheight to Celcius. Again, this will not convert any previous manual entries you have made.
🩸 Blood glucose
You can also change Blood glucose from mmol/L to mg/dL.
Still need some help? Get in touch with our Support Team.
In some very rare cases, users have experienced a constant loading screen or crashing upon opening the app.
The first thing to try is uninstalling and reinstalling Bearable (don’t worry you won’t lose any data).
If this does not work then please email us at support@bearable.app detailing exactly what happened and when it happened. We have backups for all accounts, so we should be able to restore your account to an earlier working date.
We’ve had a lot of requests from the lovely folk across the pond to change to a 12-hour format, instead of 24-hour military time.
It’s actually hard to display extra text (i.e am and pm) in such a small space without making it ineligible, given our current designs, hence why we don’t have this yet. We also have times in a lot of different places, so it would be a big redesign job to sort this out optimally.
However, we are already considering the best way to make a 12-hour option in the future. Thanks for your patience!
Why yes, there is. Thanks for asking.
We have set up an interactive roadmap where you can see what we have planned, what we’re considering, what we’ve recently completed, and more.
You’ll even be able to post your own suggestions and vote + comment on others.
Check it out here: https://changemap.co/bearable-/bearable-roadmap/
We understand that some of you are having issues receiving our notifications.
Either:
-
- You are not receiving the reminders your set up at all or…
- You only receive reminders when you open the app, at which point they all come flooding in at once.
If you experience problems with push notifications the reason usually lies in restrictions imposed by the device maker. Almost 95% of reminder problems are happening on Samsung devices, so below we have included a few options to try to fix this:
-
- First, make sure it’s not just a temporary hiccup and reboot your phone.
- Review your app’s notification settings – make sure you have given Bearable the relevant permissions to allow it to send you reminders. This might be found via Settings > Apps & Notifications > [App name] > Notifications.
- There may be some battery-saving settings or background restrictions switched on. Follow the instructions listed here: https://dontkillmyapp.com/samsung
- If none of the above work, here is something else that has worked for some people (note: this is not possible on all devices): Go to ‘settings’ > ‘apps’ > press the 3 dots for the menu > chose ‘special access’. In the special access menu, choose the option called Notification Access. Turn off “Clean Master” and “Antivirus” and any other possible security/antivirus apps that may have been controlling the notifications.
Some other things that might help you to resolve this.
-
- Check that you don’t have Do Not Disturb or Bedtime mode turned on.
- Check that Battery Saver mode is not active.
- Make sure Bearable is running on the latest version.
- Make sure your phone’s System doesn’t need updating.
- Check your Mobile Data Usage settings.
For more tips like these and for advice on how to solve them take a quick look at this article about other things that might be affecting how you receive reminders and notifications.
Still need some help? Get in touch with our Support Team.

 .
. 
 .
.