How Can We Help?
Configure and Enter data into Bearable
In Bearable your data is split between various sections where you can track different aspects of your health
You can turn on/off sections to customise the things you would like to track. to do so, scroll to the bottom of the homepage and press “Customise Homepage”.
The toggles on the left let you turn on or off sections. Use the handles on the right to drag the sections and change their order.
😑 Mood
💡 For tracking your mood and emotional state throughout the day.
Track your Mood if you want to understand:
- What might impact your Mood
- Whether your Mood and Feelings are changing over time
- To help you reflect and learn more about yourself and your emotions
- How your Mood may impact your other health outcomes
The Mood scale
Bearable uses a 1-10 scale, with lower numbers representing worse moods and higher numbers representing better moods.
Each person is different and will have their own meanings but typically this will be:
- 1-3 (Low): Very poor mood, feeling significantly down, anxious, or distressed
- 4-6 (Moderate): Neutral to mildly positive or negative moods
- 7-10 (High): Good to excellent mood, feeling positive, content, or happy
Adding Feelings
After pressing your mood you will see a place to add Feelings and any Notes relating to this entry.
You can add as many feelings as you want
Customising the list of feelings
Press the ‘+’ button to go to the Edit page
- Add a new feeling by typing at the top and pressing Confirm
- Turn feelings on/off: Use the toggles on the left. Feelings that are turned off will no longer appear in the list but any entries you made of that feeling will still be shown
- Edit a feeling name: Press on a feeling, then press the feeling name box. Press the tick in the top right when you’re done
- Reorder feelings by pressing the edit button at the top right and dragging the handles on the right. You can also sort the feelings alphabetically by pressing the ellipsis (…) on the Mood section and toggling “Sorting” from Custom to A-Z
- Delete feelings by tapping the feeling name and pressing Delete Feeling. Deleting a feeling also deletes entries of that feeling
Removing an entry
Tap the Mood entry you want to delete, then tap the trash can icon at the top left of the modal.
Mood insights
The score on the section represents your Average Mood.
Press the ellipsis (…) on the Mood section and tap Graph + Insights
You can also see Mood insights on the Impacts tab and Trends tab
🤕 Symptoms
💡For tracking the presence and severity and physical or emotional symptoms
Track symptoms to understand:
- Your daily symptom score
- Possible symptom triggers
- Whether symptoms are changing over time
- How often symptoms occur
How to record symptoms
The section shows a list of symptoms you have active, sorted by Group. Press a rating to record a symptom entry
💡We use a five point scale:
0 – None
1 – Mild
2 – Moderate
3 – Severe
4 – Unbearable
Each person’s ratings will depend on their personal experience. You can log a symptom you don’t have active. Press the ‘Log other’ button at the bottom of any group
Adding a Symptom note
After making a rating press the page with a plus button to make a symptom note.
Changing or removing an entry
Press the entry again to choose a new rating
Press the ‘-’ sign on the left to remove an entry
Mark Remaining as None
This button is a shortcut: any symptoms without an entry will be marked as 0. This can improve insights as it helps to distinguish days when symptoms were not present and days when no data was entered.
Adding a symptom
Press the Add/Edit button at the top of the section. Then press the Group you want to add the Symptom to.
Use the toggles on the left to turn on/off symptoms.
Add any custom symptom by typing at the top and pressing Confirm
Customising symptoms (from the Edit menu)
Press the Add/Edit button at the top of the section.
- Add a new group by pressing “Add symptom group”
- Edit a group by pressing the Group and tapping “Group settings” at the bottom
- Reorder groups by pressing Edit at the top right and dragging the Groups using the handles
- Reorder symptoms within a group by pressing on the group and pressing Edit, then use the handles to drag the symptoms to the order you like
- Sort symptoms alphabetically by going to the ellipsis (…) at the top right of the section and toggling between Sorting: Custom and Sorting: A-Z
- Move symptoms between groups by pressing on a symptom name and then picking a group from the selection
- Edit a symptom name by pressing on a symptom, pressing on the Description and confirming using the tick at the top right. Note, you cannot edit default symptoms but you can hide them.
- Delete a symptom by pressing on the symptom name and pressing Delete Symptom. You cannot delete the default symptoms
Entering symptoms through the day
You can track how your symptoms change over the day. Press the ellipsis (…) at the top right of the Symptoms section and toggle between Time Periods ON and Time Periods OFF.
When time periods are on you will see four boxes. Tap a box multiple times to change the severity. The four boxes relate to different parts of the day
- Pre: Midnight – 6am
- Am: 6am – Midday
- Mid: Midday – 6pm
- Pm: 6pm – Midnight
💡 Tracking throughout the day requires more effort and we suggest you only do this if it’s necessary for your symptoms
Symptom insights
Press the ellipsis (…) at the top right of the symptoms section and choose Graph + Insights
You can view correlations between symptoms and other health factors in the Impacts tab
You can see how your Symptoms have been changing in the Trends tab
⚡ Energy
💡 For tracking Energy Levels through the day
How to record energy levels
Simply tap a rating from 1-5
- 1️⃣ Very low
- 2️⃣ Low
- 3️⃣ OK
- 4️⃣ High
- 5️⃣ Very high
The scale should be used according to your own baseline. Even if you never have what others might describe as “very high” energy levels, it can still be very high for yourself.
To add another entry tap the ‘+’ button
If you add multiple entries, the energy score shown on the closed section represents your average energy level
Changing the entry time
Tap the underlined time to bring up the clock picker.
Adding a note
You can add a written note for each entry by pressing on the button with a page and plus symbol. This button appears after you make a 1-5 rating.
Removing an entry
Press the ‘-’ symbol to the left of the rating
🔥 Other Factors
💡 For recording anything you do that could impact your health, such as activity level, stress, work, social life and personal care. This can include triggers and treatments for your different symptoms and conditions.
How to record factors
Factors can be entered in two ways
- a binary scale,
- variable scale, such as high/medium/low
For binary factors, just tap them and they’ll switch from off to on
For variable factors, tap the relevant rating
💡Copying last entries
If you do many of the same things each day you can copy your last entries. To do this press the ellipsis (…) at the top right of the Other Factors section and press “Copy Last Entry” at the bottom of this menu
The numbers in the Other Factors section
Shows the total number of factors with entries
Remove a factor entry
For binary factors just toggle them off again
For variable factors, press the ‘-’ symbol just underneath the name
Entering factors more than once a day
💡 Tracking throughout the day requires more effort and we suggest you only do this if it’s necessary for your symptoms
You can enter factors up to four times per day, using four time blocks
- Pre: Midnight – 6am
- Am: 6am – Midday
- Mid: Midday – 6pm
- Pm: 6pm – Midnight
To switch on the time blocks press the ellipsis (…) at the top right of the Other Factors section and toggle between Time periods: ON and Time periods: OFF
To enter into time blocks tap each box multiple times to set the rating.
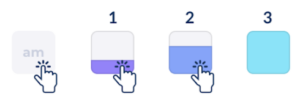
If the factor didn’t happen in any time block, tap “No”
💡You can also tap the “Overall” box on the left to set all time periods together
Factor categories
Factors will be contained within different categories like Work and Lifestyle.
To add a new category, tap Add/Edit at the bottom of the section then tap “Add Category” at the bottom. Choose a name and symbol for the category, then press the tick at the top right corner
To move a factor into a category, tap Add/Edit at the bottom of the section, tap the category the factor is currently in, tap on the factor and then press the dropdown “Choose a factor category for this factor”
To edit a category, tap Add/Edit at the bottom of the section, tap on the Category and press Category Settings at the bottom of the screen. You can rename and change the symbols.
To delete a category, tap Add/Edit at the bottom of the section, tap on the Category, press Category Settings at the bottom of the screen, then press Delete Category.
⚠️ This will also delete factors within that category. You may prefer to hide it, or make sure you move the factors to other categories first
To show or hide a category, tap Add/Edit at the bottom of the section, then use the toggle on the left of the category name
To reorder categories, tap the Edit button at the top right, then use the handles to the right of each category to drag them into the order you want
Creating and editing factors
- To add a new factor, tap the ‘+’ button at the bottom of the relevant category. At the top, enter the name of the new factor in the “Add Factor” box and tap “Confirm”. Press the tick at the top right to add the new factor.
- To edit a factor name, tap the ‘+’ button at the bottom of the relevant category and then press the factor. Press the name to edit it
- To change a factor scale, tap the ‘+’ button at the bottom of the relevant category and then press the factor. Choose the relevant scale, either binary or variable scale.
- To hide a factor, tap the ‘+’ button at the bottom of the relevant category, then press the toggle to the left of the factor name
- To delete a factor, tap the ‘+’ button at the bottom of the relevant category and then press the factor. Then press the “Delete factor” button at the bottom of this page. Deleting a factor will delete its data too. You may prefer to just hide the factor instead.
- To change the order of factors:
- If you want a custom order, tap the ‘+’ button at the bottom of the relevant category then press the Edit button at the top right of the screen. Use the handles to the right of each factor to drag them into the order you want and then press ‘Done’ at the top right.
- If you want an A-Z order, press the ellipsis (…) at the top right of the Other Factors section and then toggle between “Sorting: Custom” and “Sorting: A-Z”
😴 Sleep
💡 For tracking the amount you sleep, your sleep quality and related factors such as reading before bed
Entering Time asleep
👉 Enter your Sleep for the previous night
Press the +/- buttons to quickly enter a sleep amount
If you want to enter the start and end times, press the middle button
To enter an exact amount press the middle button and then “tap here to enter manually”
To remove Time Asleep
Press the middle button and then press the trash can icon in the top right
Entering Sleep Quality
👉 Enter your Sleep Quality for the previous night
Press a rating from 1-5
- 1️⃣ Awful
- 2️⃣ Poor
- 3️⃣ OK
- 4️⃣ Good
- 5️⃣ Great
You can add a note by pressing the button with a page and + symbol. Some users record dreams, interruptions or things for their doctors.
Entering Sleep Factors
👉 Enter your Sleep Factors for the previous night
Sleep factors are things that might impact your health relating to your sleep, like an early bedtime, reading before bed or using a CPAP machine.
Toggle these factors on and off by pressing them.
Customising Sleep Factors
- Show or hide sleep factors by pressing the ‘+’ button and then using the toggles to the left of the factor names
- Add new Sleep factors by pressing the ‘+’ button and typing at the top.
- Edit the order of Sleep factors by pressing the ‘+’ button, then pressing Edit, and using the handles to the right of the factors to drag them into a custom order
- Sort them alphabetically by pressing the ellipsis (…) at the top right of the Sleep section and toggling between Sorting: Custom and Sorting: A-Z
Entering Naps
You can record naps in the Nap time factor. Turn this on by pressing the ‘+’ button at the bottom of the section and using the toggle next to “Nap Time”.
Use the +/- buttons to enter the total time you napped today
Entering Time in Bed
Sometimes you spend time in bed when awake. You can track this in the Time in Bed factor.
Turn this on by pressing the ‘+’ button at the bottom of the section and using the toggle next to “Time in Bed”.
Press the button to enter the time you got into bed and the time you got out of it. If you enter both the total time will be calculated
Syncing Sleep
You can also sync your Time Asleep and Time in Bed.
Press the “Sync sleep from your device” button at the top of the section.
Following the instructions on the syncing page to set this up.
👋 Still have questions?
Let us know by contacting support@bearable.app and a member of the Bearable team can help you with anything you need.